This chapter contains the following topics:
Printing a WIP Selection Worksheet
Entering and Printing Current Matters
Billing Contingent Fee Matters
Use this selection to specify the work in process to be billed to each client. You may also use this selection for periodic retainer billings and fixed fee billings for clients.
Specifically, use this selection to perform the following actions:
| 1. | Print a WIP selection worksheet, using WIP selection worksheet, for the range of clients to be billed. Use this worksheet to determine the WIP to be billed, including any write-ups or write-downs. You may enter the adjustment amount, if any, in a space provided for each WIP item printed on the worksheet. |
| 2. | Select WIP for billing, using Select WIP for billing. Use this function to enter write-ups or write-downs as needed, and to modify billing descriptions as needed. |
| 3. | Enter any additional billing adjustments, using Billing adjustments. |
| 4. | Print a billing edit list, using Edit list, and compare the edit list with the WIP selection worksheet, to ensure that all WIP has been properly selected and written up or down as needed. |
If you bill retainers periodically or provide services on a fixed fee or contingent basis, then you may also perform the following actions:
| 1. | Enter any periodic retainers or one-time retainers to be billed, using Retainer billing. Periodic retainers may be either entered manually, or generated automatically based on information in the Client record. |
| 2. | Enter billings for fixed fee matters, using Fixed fee billing. These may be either entered manually, or generated automatically based on information in the Matter record. |
| 3. | Enter any billings for contingent fee matters, using Contingent fee billing. |
| 4. | Print a billing edit list, using Edit list, to verify the periodic retainers, fixed fee matters, and contingent matters to be billed. |
| 5. | Enter new "current matters" for those advance billing retainer clients for whom retainer billing on the previous "current matter" has been completed. (See the section in this chapter titled "Current Matters".) |
|
Note |
You may bill WIP at the same time as retainers, fixed fee, and contingent fee matters are billed. The Billing Edit List will show all items to be billed for each client printed. |
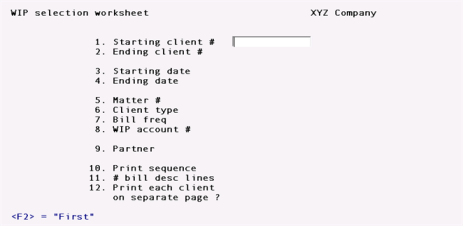
Select
WIP selection worksheet from the Billing menu of the T/B menu.
This is the screen you see:
1. Starting client #
2. Ending client #
Enter the range of client numbers to be included on the worksheet. Follow the screen instructions.
|
Format |
12 characters for each field |
|
Example |
Press F2 at both fields |
3. Starting date
4. Ending date
Enter the range of dates for the work-in-process items that are to be included on the worksheet. Follow the screen instructions.
|
Format |
MMDDYY for each field |
|
Example |
Press F2 at both fields |
5. Matter #
(This field may only be entered if the starting and ending client #'s are the same.)
Enter the matter # for this client, or use the option:
|
Format |
12 characters |
|
Example |
(This field is skipped) |
|
<F5> |
For "All" matters for this client |
|
<ENTER> |
For none. In this case, time and expense entries that were entered without a matter number will be printed on the worksheet |
6. Client type
Enter the type for the clients to be printed, or use the option:
|
<F5> |
For "All" client types |
|
Format |
5 characters |
|
Example |
Press F5 |
7. Bill freq
Clients will only be printed on the worksheet if their billing frequency matches one of the billing frequencies entered here.
You may enter up to S billing frequencies by typing a code letter, pressing ENTER, typing the next code letter, pressing ENTER, etc.
Or you can use the option:
|
<F5> |
For "All" billing frequencies |
|
Format |
5 codes of 1 character each |
|
Example |
Press F5 |
8. WIP account #
Enter the WIP account # for clients to be printed on the worksheet, or use one of the options:
|
<F2> |
For the default WIP account from the TB Control information |
|
<F1> |
To scan through the other WIP accounts on file |
|
<ENTER> |
For "All" accounts |
|
Example |
Press ENTER |
9. Partner
Enter the partner for the clients to be printed, or use one of the options:
|
<F1> |
To scan through the next partner |
|
<SF1> |
To scan through the previous partner |
|
<F5> |
For "All" partners |
|
Format |
3 characters |
|
Example |
Press F5 |
10. Print sequence
Enter D to have the WIP entries printed in date sequence on the worksheet, or S to have the WIP entries printed by service or expense code on the worksheet. (Press ENTER to use the default WIP selection method entered in Control information.)
If you choose D, all service entries for a client's matter will appear in chronological sequence, followed by all expense entries for the matter.
If you choose S, all entries for a specific service or expense code for a client's matter will appear together in chronological sequence.
|
Format |
1 character |
|
Example |
Press ENTER for the default, S |
11. # bill desc lines
You may choose to print 0, 1, 2, or "AH" billing description lines for each WIP item printed.
Enter 0, 1 or 2, or use the option:
|
<F5> |
For "All" bill description lines |
|
Format |
1 character |
|
Example |
Type 1 |
12. Print each client on separate page ?
Answer Y to print each client on a separate page.
|
Example |
Press ENTER for the default, N |
Select
Select WIP for billing from the Billing menu.
This is the screen you see:

*1. Client #
Enter the client number or use one of the options:
|
<F1> |
To scan through the clients who have unbilled WIP |
|
<SF1> |
To scan through the previous clients |
|
<F5> |
To search for a client by client number |
|
<F6> |
To search for a client by client name |
|
Format |
12 characters |
|
Example |
Type 5 |
*2. Matter #
Enter the matter or use one of the options:
|
<F1> |
To scan through the matters which have unbilled WIP |
|
<SF1> |
To scan through the previous matters |
|
<F5> |
To search for a matter by matter number |
|
<F6> |
To search for a matter by matter description |
|
Format |
12 characters |
|
Example |
Type 120 |
If the service billing terms for the matter are "By the hour", then the unbilled WIP service items are displayed. Otherwise, the unbilled WIP expense items are displayed.
The items are displayed in the sequence specified by "WIP selection method" in Control information.
Select WIP items for billing using the arrow keys. Answer Y to select the item, N to unselect the item, or W to select the item for billing without printing the WIP item detail for it on the bill.
|
Example |
Type Y for each WIP item. |
Your screen will look like this:
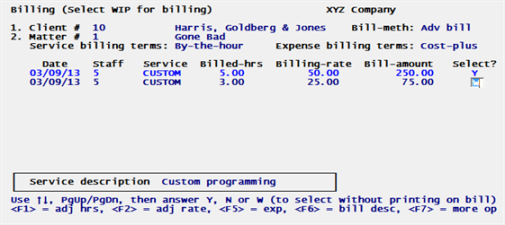
Press End at the last selection to select another client.
You can move forward to the next screen (if any) by using the PgDn key.
You can move back to the previous screen (if any) by using the PgUp key.
You may also use the Home key to move to the first unbilled WIP item for the matter, or use End to move to the last unbilled WIP item for the matter.
If the expense billing terms for the matter are "Cost-plus", then you can display the unbilled expenses by pressing F5.
|
Example |
Press F5. |
Then select the expenses for this matter as shown on the next screen:

Use F1 to adjust the hours to be billed. Use F2 to adjust the billing rate. An F1 default is provided based upon the default service adjustment percentage in the Client record. If you adjust either the hours billed or the billing rate, then the WIP item is selected automatically if it is not already selected.
|
Note |
To write-off an amount after it has been billed, use Cash receipts in A/R and enter the amount to be written off as an allowance amount. See the chapter titled Cash Receipts in the A/R User Documentation. |
|
Example |
Now select the WIP for billing as shown on this screen: |
*SCREEN*
Use F6 to enter or modify the billing description for the WIP item.
Use F7 to select other options. These options are listed below:
|
Change client |
Switch to a different client for WIP selection. |
|
Change matter |
Switch to a different matter for this client. |
|
Jump by service* |
Jump to the first unbilled WIP open item matching the service # entered. (Only available when displaying WIP by service and expense code.) |
|
Jump by date |
Jump to the first unbilled WIP open item dated on or after the date entered. (Only available when displaying WIP by date.) |
|
List in svc seq |
Display the WIP open items in service code sequence. (Only available when displaying WIP in date sequence.) |
|
List in date seq |
Display the WIP open items in date sequence. (Only available when displaying WIP in service code sequence.) |
|
Next client/matter |
Switch to the next client/matter in WIP Open Items. If there are additional matters to be billed for the current client, the next matter is displayed. Otherwise, the first matter for the next client is displayed. |
|
Next matter |
Switch to the next matter, if any, for the client. |
|
Adjust all services |
Adjust all WIP service items for this matter which have been selected for billing and which have not been adjusted already. Hours and rates can be adjusted separately. A percentage to adjust can be entered for each. An F1 prompt is provided to the default service adjustment percentage in the Client record. |
|
Exclude all services |
Set the selection status of all WIP items for this matter to N. After using this option, no unbilled WIP service items are selected for the matter. |
|
Select all services |
This option requires a cut-off date to be entered. All unbilled WIP items for services dated on or before the cut-off date are selected for billing. You may also specify that the WIP items are to be selected without printing the detail on the bill. In this case, W will appear next to each WIP item selected. |
|
Billing totals |
Display the total amount to be billed based on selected services and expenses. |
|
Show original amts |
The original amounts (prior to any adjustments) are displayed. |
|
Show billing amts |
This option displays the amounts to be billed (including any adjustments). |
When unbilled WIP expense items are displayed, the following options replace their counterparts for services:
|
F1 |
Adjust the amount to be billed for the expense. An F1 default is provided based upon the default expense adjustment percentage in the Client record. |
|
Jump by expense # |
Jump to the first unbilled WIP open item matching the expense # entered. (Only available when displaying WIP by service and expense code.) |
|
List in exp seq |
Display the WIP open items in expense code sequence. (Only available when displaying WIP in date sequence.) |
|
Adjust all expenses |
Adjust all WIP expense items for this matter which have been selected for billing and which have not been adjusted already. A percentage to use for the adjustment is entered. An F1 prompt is provided to the default expense adjustment percentage in the Client record. |
|
Exclude all expenses |
Set the selection status of all WIP items for this matter to N. After using this option, no unbilled WIP expense items are selected for the matter. |
|
Select all expenses |
This option requires a cut-off date to be entered. All unbilled WIP items for expenses dated on or before the cut-off date are selected for billing. You may also specify that the WIP items are to be selected without printing the detail on the bill. In this case, W will appear next to each WIP item selected. |
As described above, entering W when selecting a WIP item for billing will cause the item to be billed without printing the detail for the item on the bill. This is useful in two different situations:
| 1. | W may be used when selecting a WIP item and a correcting entry for the item, in order to avoid printing either one on the bill. |
For example, if a WIP item had been erroneously posted for $100 and a correcting entry was later posted for -$100, both could be selected using W. These items will not be printed on the invoice and will not change the invoice amount. However, both items will be removed from the WIP Open Item File during invoice posting.
| 2. | When service and expense codes are printed in a summary fashion on a bill, but detail of specific codes is required on an attachment to the bill, W can be used when selecting WIP for the codes whose detail is not to be printed on the attachment. |
For example, if detail is to be printed only for client conferences, then all codes except the ones for client conferences can be selected using W. Then, when printing the detail using an attachment format as described in the chapter titled Invoice Formats, only the conference detail will be printed and the detail of the other WIP items billed will be suppressed.
This selection is only used if you have specified in Clients that the billing method for one or more clients is "By advance billing".
For each client whose billing method is "By advance billing", you must enter the matter to which a periodic advance billing (entered using Retainer billing) is to be applied as a billing on account.
When a periodic advance retainer billing is posted for a client, the amount billed will be accumulated in the Advance Billing File for the matter specified here.
You may use the Aging Report to check the advance billings on file for each matter.
When advance billing has been completed for the matter entered here, you may specify a different current matter for the client. From that point on, advance billings will apply to the new current matter.
Select
Current matters from the Billing menu.
A screen appears for you to enter Client # and Matter #.
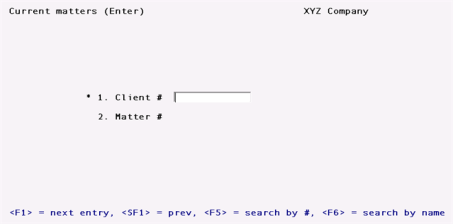
*1. Client #
Enter the client number, or use one of the options:
|
<F1> |
To scan through the clients who have unbilled WIP |
|
<SF1> |
To scan through the previous clients |
|
<F5> |
To search for a client by client number |
|
<F6> |
To search for a client by client name |
|
Format |
12 characters |
*2. Matter #
Enter the matter number, or use one of the options:
|
<F1> |
To scan through the matters which have unbilled WIP |
|
<SF1> |
To scan through the previous matters |
|
<F5> |
To search for a matter by matter number |
|
<F6> |
To search for a matter by matter description |
|
Format |
12 characters |
|
Note |
In order for a matter to be entered here, advance billings must apply to either services or expenses (or both) for the matter, as entered in the Matter record. |
Select
Current matters from the Reports, general menu of the T/B menu.
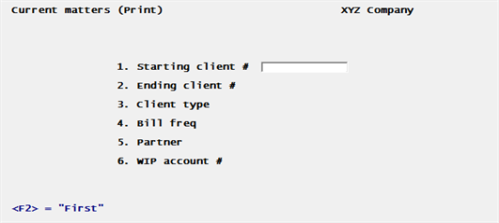
On the screen which appears, enter the following information:
1. Starting client #
2. Ending client #
Enter the range of client numbers to be included on the report or use the option:
|
<F2> |
For "First" client number or "Last client number respectively |
|
Format |
12 characters for each field |
3. Client type
Specify the client type for which this report is to be printed, or use one of the options:
|
<F5> |
For "All" client types |
|
(blank) |
For blank client types only |
|
Format |
5 characters |
|
Example |
Press F5 |
4. Bill freq
Clients will only be printed on the report if their billing frequency matches one of the billing frequencies entered here.
You may enter up to 5 billing frequencies by typing a code letter, pressing ENTER, typing the next code letter, pressing ENTER, etc.
Or you can use the option:
|
<F5> |
For "All" frequencies |
|
Format |
5 codes of 1 character each |
|
Example |
Press F5 |
5. Partner
Enter the partner number, or use one of the options:
|
<F1> |
To scan through the partners on file |
|
<SF1> |
To scan through previous partners on file |
|
<F5> |
For "All" partners |
|
Format |
3 characters |
|
Example |
Type 1 |
6. WIP account #
Enter the WIP account # for clients to be printed on the report, or use one of the options:
|
<F2> |
For the default WIP account from T/B Control information |
|
<F1> |
For other accounts |
|
<F5> |
For "All" accounts |
|
Example |
Press ENTER |
Use this selection to enter:
| 1. | Periodic flat fee retainer billings for clients whose billing method is "By flat fee". |
| 2. | Periodic advance billing retainers for clients whose billing method is "By advance billing". |
| 3. | One-time retainers for any client. These retainers become billings on account for the client and matter specified. Such retainers are used for upfront retainers or anytime an additional billing on account is required. |
Select
Retainer billing from the Billing menu.
Selection method
Automatic Selection
If you choose automatic selection, periodic retainer billings will be selected automatically based on the criteria entered here. Having selected periodic retainers automatically, you may then later use manual selection to enter specific billing descriptions for individual periodic retainer billings. See Automatic Retainer Billing
Manual Selection
If you choose manual selection, you may enter retainer billings for specific clients. These retainer billings can be either periodic retainer billings (if the client's billing method is either "By flat fee" or "By advance billing") or one-time retainer billings for any client. See Manual Retainer Billing
If you answer A, this is the screen you see:
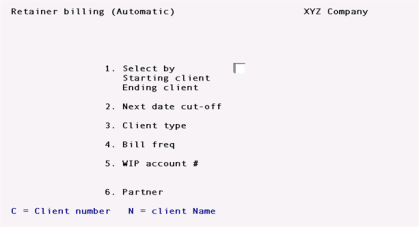
1. Select by
Choose whether to select by C (client number) or N (client name).
|
Format |
1 character |
|
Example |
Type C |
Starting client (# or name)
Ending client # (# or name)
Depending on your "Select by" choice, enter the range of client #'s or names to be selected. Follow the screen instructions.
|
<F2> |
For starting and ending client respectively |
|
Format |
12 characters each field (client #) 30 characters at each field (client name) |
|
Example |
Press F1 at both fields |
2. Next date cut-off
If you want to select clients with a "next date" on or before a specific date, enter that date here, or use the option:
|
ENTER |
For no cut-off date |
|
Format |
MMDDYY |
|
Example |
Press ENTER |
3. Client type
Enter the type for the clients to be selected, or use the option:
|
<F5> |
For "All" client types |
|
(blank) |
For blank client types only |
|
Format |
5 characters |
|
Example |
Press F5 |
4. Bill freq
Clients will only be printed on the report if their billing frequency matches one of the billing frequencies entered here.
You may enter up to 5 billing frequencies by typing a code letter, pressing ENTER, typing the next code letter, pressing ENTER, etc.
Or you can use the option:
|
<F5> |
For "All" frequencies |
|
Format |
5 codes of 1 character each |
|
Example |
Press F5 |
5. WIP account #
Enter the WIP account # for clients to be selected, or use one of the options:
|
<F2> |
For the default WIP account from T/L Control information |
|
<F1> |
For other accounts |
|
<F5> |
For "All" accounts |
|
Example |
Press ENTER |
6. Partner
Enter the partner for the clients to be selected, or use one of the options:
|
<F5> |
For "All" partners |
|
Format |
3 characters |
Once you press ENTER at "Field number to change ?", each Client record in die range specified is examined, and a periodic retainer billing is generated if all of the following conditions are met:
| 1. | The client's billing method is "By flat fee" or "By advance billing". |
| 2. | If die client's billing method is "By advance billing", then there must be a current matter for the client in the Current Matter File and this matter must allow advance billings to be applied to either services or expenses. In this case, the retainer billing transaction generated is for the matter specified in the Current Matter File. |
| 3. | The next-date for retainer billing in the client's record is on or before the cut-off date. |
| 4. | The next-date for retainer billing in the client's record is on or after the "First date" and on or before the "Final date" in the client's record. |
| 5. | The "Times used" in the client's record is less than the "Max number of uses". |
| 6. | There is no periodic retainer billing transaction already on file for the client. |
For each retainer billing transaction generated, the amount for the transaction is as specified in the Client record.
Once automatic selection is complete, you may choose to select another range of clients automatically, or you may manually modify the periodic retainer billing transactions that were generated automatically.
If you answer M, this is the screen you see:
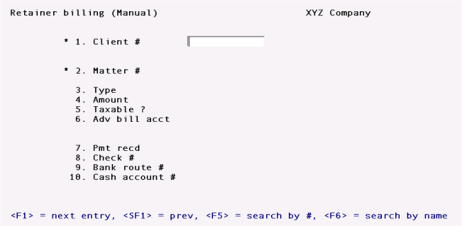
*1. Client #
Enter the client number, or use one of the options:
|
<F1> |
To scan through the clients who have unbilled WIP |
|
<SF1> |
To scan through the previous clients |
|
<F5> |
To search for a client by client number |
|
<F6> |
To search for a client by client name |
|
Format |
12 characters |
*2. Matter #
Enter the matter number, or use one of the options:
|
<F1> |
To scan through the retainer billings already on file for the client specified above |
|
<SF1> |
To scan through the previous retainer billings |
|
<F5> |
To search for a matter by matter number |
|
<F6> |
To search for a matter by matter description |
|
Format |
12 characters |
|
Note |
In order for a matter to be entered here for a periodic advance billing retainer or a one-time retainer, advance billings must apply to either services or expenses (or both) for the matter, as entered in the Matter record. |
3. Type
(If the client's billing method is "By time and expense", then this field is set to O and may not be changed, since such a client may not receive a periodic retainer billing.)
Enter P for a periodic retainer billing or O for a one-time retainer billing.
|
Format |
1 character |
|
Example |
(This field is skipped) |
4. Amount
Enter the amount of the retainer to be billed, or use one of the options:
|
<F2> |
For the periodic retainer amount specified in the client's record (periodic retainer billing only) |
|
Note |
A negative amount may be entered here only for one-time retainers. A negative one-time retainer is used to credit a client's A/R account for advance billings previously billed. For example, if a retainer is to be refunded to a client, then a negative one-time retainer would be entered for the amount to be refunded. If an invoice is printed and posted for this negative one-time retainer, then a credit memo will be generated for this client in the A/R Open Item File in A/R. At that point, the credit memo can be applied to existing A/R open items for the client. |
|
Format |
9,999,999.99- |
|
Example |
Type 625 |
5. Taxable ?
This field is "(Not applicable)" for a periodic retainer billing for a client whose billing method is "By advance billing" or for a one-time retainer billing.
For a flat fee retainer billing, the field is set per the Client record's taxable flag. This may be changed at "Field number to change ?".
|
Example |
(This field is skipped) |
6. Adv bill acct (Revenue acct)
This field is set to the advance billing account from the Client record for a periodic retainer billing for a client whose billing method is "By advance billing", or for a one-time retainer billing. This account may not be changed at "Field number to change ?".
For a flat fee retainer billing, the field is set to the revenue account from the Client record. This field may be changed at "Field number to change ?". In this case, you may use F1 to obtain the revenue account from the Client record.
|
Example |
(This field is skipped) |
7. Pmt recd
(If the amount in field 4 above is negative, then fields 7-10 may not be entered.)
Enter the amount of any payment already received for this retainer.
|
Format |
9,999,999.99- |
|
Example |
Type 625 |
|
Note |
If a client is paying for more than one type of billing (retainer, fixed fee, contingent fee, or adjustment) or for more than one matter, then separate checks should be written for each transaction entered. |
8. Check #
|
Note |
This field is skipped if no payment was received. |
Enter the check number of the payment received. If currency was received, press ENTER; "♦♦ Cash **" displays.
|
Format |
99999999 |
|
Example |
Type 2117 |
9. Bank route #
|
Note |
This field is skipped if no payment was received. |
Enter the "routing number" that is on the check. This is usually in the upper right-hand portion of the check and looks something like 99-999/9999.
If you are entering a cash payment, the field displays "Reference" and you may enter a reference note.
|
Format |
25 characters |
|
Example |
Type 63-466/431 |
10. Cash account #
|
Note |
This field is skipped if no payment was received. |
Enter the cash account to which this payment is to be deposited, or use one of the options:
|
<F2> |
For the default cash account from the A/R Control information |
|
<F1> |
For other cash accounts |
|
Example |
To scan through the other cash accounts on file |
From "Field number to change ?" you may enter or change the billing description for the retainer billing transaction by pressing F6. The following screen appears:
*SCREEN*
The description you enter here will be printed on the invoice for this client, provided you specify to do so in the invoice format used for printing.
|
Format |
Enter the billing description shown above. |
|
Example |
10 lines of up to 50 characters each |
This selection uses Passport's text editing function. You enter text in much the same way as most word processing programs, using the ENTER key, arrow keys, DELETE key, ESC when done, etc. When you are finished entering text, press ESC and follow the screen instructions.
When you press ESC from the description window, you have these file options:
|
File |
Save what I have just entered/changed. (Like pressing ENTER at "Field number to change?" in other selections.) |
|
Save & Continue |
Save What I have just entered/changed, but leave the information on the screen because I want to continue to work with it. |
|
Abandon changes |
Throw away what I have just entered/changed. (Like pressing /ESC at "field number to change?" in other selections.) |
|
Delete |
Delete this billing description from the screen. (Like Delete in other selection.) The software will ask you to confirm the deletion with an "OK to Delete?" message. |
If an invoice has already been printed for the retainer billing, then "Already printed" is displayed at the top of the screen.
If you select any field of the transaction (including the billing description) for modification, or if you choose to delete the transaction, you will be warned that an invoice has already been printed for the client. If you choose to continue, then the client's invoice will be voided and will have to be printed again, using Print invoices.
Additionally, if you attempt to enter a new transaction for a client and an invoice has already been printed for the client, you are warned that entering this transaction will void the invoice.
Use this selection to enter billings for matters whose service billing terms or expense billing terms are "fixed fee".
Select
Fixed fee billing from the Billing menu.
A screen appears for you to choose the selection method.
Choose A (automatic) or M (manual) selection of fixed fee matters to be billed.
|
Format |
1 character |
|
Example |
Type A |
Automatic Selection
If you choose automatic selection, fixed fee matters will be selected automatically based on the criteria entered here. Having selected fixed fee matters automatically, you may then later use manual selection to enter specific billing descriptions for individual fixed fee billings.
Manual Selection
If you choose manual selection, you may enter fixed fee billings for specific clients.
If you answer A, this is the screen you see:
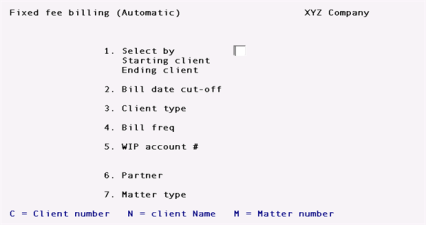
1. Select by
Choose whether to select by C (client number), N (client name), or M (matter number).
|
Format |
1 character |
|
Example |
Type C |
Starting (client # or client name or matter #)
Ending (client # or client name or matter #)
Depending on your "Select by" choice, enter the range of client #'s, names, or matter #'s to be selected. Follow the screen instructions.
|
<F2> |
For starting and ending client respectively |
|
Format |
12 characters each field (client #) 30 characters at each field (client name) 12 characters at each field (matter #) |
|
Example |
Press F2 at both fields |
2. Bill date cut-off
If you want to select matters with a "next date" on or before a specific date, enter that date here, or use the option:
|
ENTER |
For no cut-off date |
|
Format |
MMDDYY |
|
Example |
Press ENTER |
3. Client type
Enter the type for the clients to be selected, or use the option:
|
F5 |
For "All" client types |
|
(blank) |
For blank client types only |
|
Format |
5 characters |
|
Example |
Press F5 at both fields |
4. Bill freq
Clients will only be selected if their billing frequency matches one of the billing frequencies entered here.
You may enter up to 5 billing frequencies by typing a code letter, pressing ENTER, typing the next code letter, pressing ENTER, etc.
Or you can use the option:
|
<F5> |
For "All" frequencies |
|
Format |
5 codes of 1 character each |
|
Example |
Press F5 |
5. WIP account #
Enter the WIP account # for the clients to be selected, or use one of the options:
|
<F2> |
For the default WIP account from T/L Control information |
|
<F1> |
For other accounts |
|
<F5> |
For "All" accounts |
|
Example |
Press ENTER |
6. Partner
Enter the partner for the clients to be selected, or use the option:
|
<F5> |
For "All" partners |
|
Format |
3 characters |
7. Bill freq
Enter a matter type to restrict automatic fixed fee billing selection to that matter type, or use the option:
|
<F5> |
For "All" matter types |
|
Format |
5 characters |
|
Example |
Press F5 |
Once you press ENTER at "Field number to change ?", each fixed fee matter for each client in range, or each fixed fee matter in range if selecting by matter number, is examined. A fixed fee retainer billing transaction is generated if all of the following conditions are met by the matter:
| 1. | The next-date for fixed fee billing in the Matter record is on or before the cut-off date. |
| 2. | The amount billed to date on the matter is less than the total fee for the matter. |
| 3. | The total fee for the matter is greater than zero. |
For each fixed fee transaction generated, the amount for the transaction is as specified by either the Matter record or the amount remaining to be billed, whichever is smaller.
Once automatic selection is complete, you may choose to select another range of clients or matters automatically, or you may manually modify the fixed fee billing transactions that were generated automatically.
If you answer M, this is the screen you see:
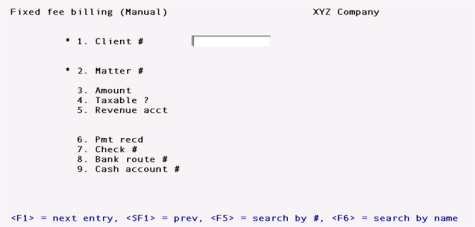
*1. Client #
Enter the client number or use one of the options:
|
<F1> |
To scan through the fixed fee billing transactions on file |
|
<SF1> |
To scan through previous fixed fee billing transactions |
|
<F5> |
To search for a client by client number |
|
<F6> |
To search for a client by client name |
|
Format |
12 characters |
|
Example |
Type 5 |
*2. Matter #
Enter the matter or use one of the options:
|
<F1> |
To scan through the fixed fee billings already for the client specified above |
|
<SF1> |
To scan through previous fixed fee billings |
|
<F5> |
To search for a matter by matter number |
|
<F6> |
To search for a matter by matter description |
|
Format |
12 characters |
|
Example |
Type 117 |
|
Note |
In order for a matter to be entered here, either the service billing terms or expense billing terms (or both) must be "Fixed fee". |
3. Amount
Enter the amount to be billed for the fixed fee matter, or use the option:
|
<F2> |
For the amount due for the billing period (per the Matter record) or the final billing amount |
|
Format |
9,999,999.99- |
|
Example |
Type 625 |
4. Taxable ?
This field is set per the Matter record's taxable flag. This may be changed from "Field number to change ?".
|
Example |
(This field is skipped) |
5. Revenue acct
This field is set to the revenue account from the Matter record. This field may be changed from "Field number to change ?". In this case, you may use F1 to obtain the revenue account from the Matter record.
|
Example |
(This field is skipped) |
6. Pmt recd
(If the amount in field 3 is negative, then fields 6-9 may not be entered.)
Enter the amount of any payment already received for this fixed fee matter, or use the option:
|
<F2> |
For the total amount billed plus any applicable sales tax |
|
Format |
9,999,999.99- |
|
Example |
Press ENTER |
|
Note |
If a client is paying for more than one type of billing (retainer, fixed fee, contingent fee, or adjustment) or for more than one matter, then separate checks should be written for each transaction entered. |
7. Check #
|
Note |
This field is skipped if no payment was received. |
Enter the check number of the payment received. If currency was received, press ENTER; "** Cash **" displays.
|
<F2> |
For the total amount billed plus any applicable sales tax |
|
Format |
99999999 |
|
Example |
(This field is skipped) |
8. Bank route #
|
Note |
This field is skipped if no payment was received. |
Enter the "routing number" that is on the check. This is usually in the upper right-hand portion of the check and looks something like 99-999/9999.
If you are entering a cash payment, this field displays "Reference" and you may enter a reference note.
|
<F2> |
For the total amount billed plus any applicable sales tax |
|
Format |
25 characters |
|
Example |
(This field is skipped) |
9. Cash account #
|
Note |
This field is skipped if no payment was received. |
Enter the cash account to which this payment is to be deposited, or use one of the options:
|
<F2> |
For the default cash account from A/R Control information |
|
<F1> |
For other cash accounts |
|
Example |
(This field is skipped) |
At "Field number to change ?" you may enter or change the billing description for the fixed fee billing transaction by pressing F6.
|
Example |
Enter the billing description shown on the following screen: |
*SCREEN*
The description you enter here will be printed on the invoice for this client, provided you specify to do so in the invoice format used for printing.
|
Format |
10 lines of up to SO characters each |
This selection uses Passport's character mode text editing function. You enter text using the ENTER key, arrow keys, DELETE key, ESC when done, etc. When you are finished entering text, press ESC and follow the screen instructions.
When you press ESC from the description window, you have these file options:
|
File |
Save what I have just entered/changed. (Like pressing ENTER at "Field number to change?" in other selections.) |
|
Save & Continue |
Save What I have just entered/changed, but leave the information on the screen because I want to continue to work with it. |
|
Abandon changes |
Throw away what I have just entered/changed. (Like pressing /ESC at "field number to change?" in other selections.) |
|
Delete |
Delete this billing description from the screen. (Like Delete in other selection.) The software will ask you to confirm the deletion with an "OK to Delete?" message. |
If an invoice has already been printed for the fixed fee billing, then "Already printed" is displayed at the top of the screen.
If you select any field of the transaction (including the billing description) for modification, or if you choose to delete the transaction, you will be warned that an invoice has already been printed for the client. If you choose to continue, then the client's invoice will be voided and will have to be printed again, using Print invoices.
Additionally, if you attempt to enter a new transaction for a client and an invoice has already been printed for the client, you are warned that entering this transaction will void the invoice.
Use this selection to bill matters whose service billing terms or expense billing terms are "Contingent fee".
Select
Contingent fee billing from the Billing menu.
This is the screen you see:
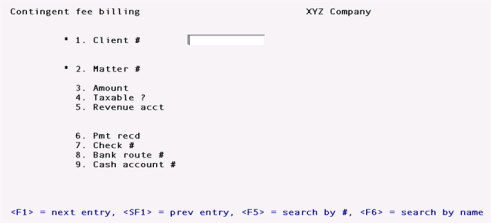
*1. Client #
Enter the client number or use one of the options:
|
<F1> |
To scan through the contingent fee billing transactions |
|
<SF1> |
To scan through the previous contingent fee billing transactions |
|
<F5> |
To search for a client by client number |
|
<F6> |
To search for a client by client name |
|
Format |
12 characters |
|
Example |
Type 5 |
*2. Matter #
Enter the matter or use one of the options:
|
<F1> |
To scan through contingent fee billings already on file for the client specified above |
|
<SF1> |
To scan through previous contingent fee billings |
|
<F5> |
To search for a matter number for this client |
|
<F6> |
To search for a matter name for this client |
|
Format |
12 characters |
|
Example |
Type 120 |
|
Note |
In order for a matter to be entered here, either the service billing terms or expense billing terms (or both) must be "Contingent fee". |
3. Amount
Enter the amount to be billed for the contingent fee matter.
|
Format |
9,999,999.99- |
|
Example |
Type 10000 |
4. Taxable ?
If the amount entered above is taxable, answer Y.
|
Example |
Type N |
5. Revenue acct
Enter the revenue account for the amount entered above, or use the option:
|
<F2> |
For the default revenue account from A/R Control information |
|
Example |
Press F2 |
6. Pmt recd
(If the amount in field 3 is negative, then fields 6-9 may not be entered.)
Enter the amount of any payment already received for this contingent fee matter, or use the option:
|
<F2> |
For the total amount billed plus any applicable sales tax |
|
Format |
9,999,999.99- |
|
Example |
Press F2 |
|
Note |
If a client is paying for more than one type of billing (retainer, fixed fee, contingent fee, or adjustment) or for more than one matter, then separate checks should be written for each transaction entered. |
7. Check #
|
Note |
This field is skipped if no payment was received. |
Enter the check number of the payment received. If currency was received, press ENTER; "** Cash **" displays.
|
<F2> |
For the total amount billed plus any applicable sales tax |
|
Format |
99999999 |
|
Example |
Type 9089 |
8. Bank route #
|
Note |
This field is skipped if no payment was received. |
Enter the "routing number" that is on the check. This is usually in the upper right-hand portion of the check and looks something like 99-999/9999.
If you are entering a cash payment, this field displays "Reference" and you may enter a reference note.
|
<F2> |
For the total amount billed plus any applicable sales tax |
|
Format |
25 characters |
|
Example |
Type 23-640/512 |
9. Cash account #
|
Note |
This field is skipped if no payment was received. |
Enter the cash account to which this payment is to be deposited, or use one of the options:
|
<F2> |
For the default cash account from A/R Control information |
|
<F1> |
For other cash accounts |
|
Example |
Press F2 |
|
Note |
If proceeds for this contingent fee matter were already deposited in a cash account as non-A/R cash using the PBS Accounts Receivable package, then enter the account which was credited at the time the non-A/R cash was posted. The posting of this contingent billing will result in this account being debited for the amount entered above, provided that you have specified "Post cash to A/R" in the T/B Control information. |
At "Field number to change ?" you may enter or change the billing description for the contingent billing transaction by pressing F6.
Enter the billing description as shown below:
*SCREEN*
The description you enter here will be printed on the invoice for this client, provided you specify to do so in the invoice format used for printing.
|
Format |
10 lines of up to 5O characters each |
This selection uses Passport's text editing function. You enter text in much the same way as most word processing programs, using the ENTER key, arrow keys, DELETE key, ESC when done, etc. When you are finished entering text, press ESC and follow the screen instructions.
If you wish to use the more powerful text editing commands which are included in this editor, see the appendix titled Text Editing.
When you press ESC from the description window, you have these file options:
|
File |
Save what I have just entered/changed. (Like pressing ENTER at "Field number to change?" in other selections.) |
|
Save & Continue |
Save What I have just entered/changed, but leave the information on the screen because I want to continue to work with it. |
|
Abandon changes |
Throw away what I have just entered/changed. (Like pressing /ESC at "field number to change?" in other selections.) |
|
Delete |
Delete this billing description from the screen. (Like Delete in other selection.) The software will ask you to confirm the deletion with an "OK to Delete?" message. |
If an invoice has already been printed for the contingent billing, then "Already printed" is displayed at the top of the screen.
If you select any field of the transaction (including the billing description) for modification, or if you choose to delete the transaction, you will be warned that an invoice has already been printed for the client. If you choose to continue, then the client's invoice will be voided and will have to be printed again, using Print invoices.
Additionally, if you attempt to enter a new transaction for a client and an invoice has already been printed for the client, you are warned that entering this transaction will void the invoice.
Use this selection to make final billing adjustments for matters whose service billing terms are "By the hour" or whose expense billing terms are "Cost plus".
Select
Billing adjustments from the Billing menu.
This is the screen you see:
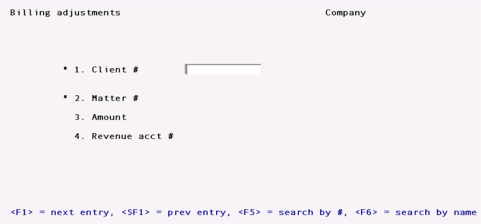
*1. Client #
Enter the client number or use one of the options:
|
<F1> |
To scan through the billing adjustment transactions |
|
<SF1> |
To scan through the previous billing adjustment transactions |
|
<F5> |
To search for a client by client number |
|
<F6> |
To search for a client by client name |
|
Format |
12 characters |
|
Example |
Type 5 |
*2. Matter #
Enter the matter or use one of the options:
|
<F1> |
To scan through the billing adjustment transactions already on file for the client specified above |
|
<SF1> |
To scan through previous billing adjustment transactions |
|
<F5> |
To search for a matter number for this client |
|
<F6> |
To search for a matter name for this client |
|
Format |
12 characters |
|
Example |
Type 120 |
|
Note |
In order to be entered here, the service billing terms for the matter must be "By the hour". |
3. Amount
Enter the adjustment amount. Positive adjustments increase the amount to be billed; negative adjustments reduce the amount to be billed.
|
Format |
9,999,999.99- |
|
Example |
Type 100 |
4. Revenue acct
Enter the revenue account for the amount entered above, or use the option:
|
<F2> |
For the default revenue account from A/R Control information |
|
Example |
Press F2 |
At "Field number to change ?", you may enter or change the billing description for the billing adjustment transaction by pressing F6. Enter the billing description as shown on the screen:
*SCREEN*
The description you enter here will be printed on the invoice for this client, provided you specify to do so in the invoice format used for printing.
|
Format |
10 lines of up to 5O characters each |
This selection uses Passport's text editing function. You enter text in much the same way as most word processing programs, using the ENTER key, arrow keys, DELETE key, ESC when done, etc. When you are finished entering text, press ESC and follow the screen instructions.
If you wish to use the more powerful text editing commands which are included in this editor, see the appendix titled Text Editing.
When you press ESC from the description window, you have these file options:
|
File |
Save what I have just entered/changed. (Like pressing ENTER at "Field number to change?" in other selections.) |
|
Save & Continue |
Save What I have just entered/changed, but leave the information on the screen because I want to continue to work with it. |
|
Abandon changes |
Throw away what I have just entered/changed. (Like pressing /ESC at "field number to change?" in other selections.) |
|
Delete |
Delete this billing description from the screen. (Like Delete in other selection.) The software will ask you to confirm the deletion with an "OK to Delete?" message. |
If an invoice has already been printed for the billing adjustment, then "Already printed" is displayed at the top of the screen.
If you select any field of the transaction (including the billing description) for modification, or if you choose to delete the transaction, you will be warned that an invoice has already been printed for the client. If you choose to continue, then the client's invoice will be voided and will have to be printed again, using Print invoices.
Additionally, if you attempt to enter a new transaction for a client and an invoice has already been printed for the client, you are warned that entering this transaction will void the invoice.
Use this selection to print out the selected WIP, retainer billings, fixed fee billings, contingent fee billings, and adjustments for each client.
For each matter printed, if the service or expense billing terms specify that advance billings are to be applied to the matter, then the edit list will show the billings on account that will be applied to the matter when the invoice is printed.
Select
Edit list from the Billing menu.
This is the screen you see:
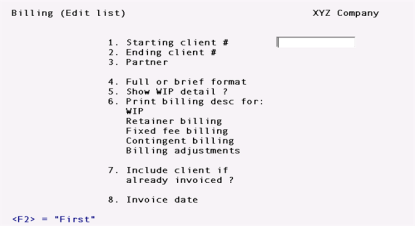
1. Starting client #
2. Ending client #
Enter the range of client numbers to be included on the edit list. Follow the screen instructions.
|
Format |
12 characters for each field |
|
Example |
Press F2 at both fields |
3. Partner
Enter the partner for the clients to be printed, or use one of the options:
|
<F1> |
To scan through the next partner |
|
<SF1> |
To scan through the previous partner |
|
<F5> |
For "All" partners |
|
Format |
3 characters |
|
Example |
Press F5 |
4. Full or brief format
Answer F for full format, or B for brief format.
|
Format |
1 character |
|
Example |
Type F |
5. Show WIP detail ?
(This field displays as "(Not applicable)" for brief format.)
Answer Y to show detail for each WIP item selected for billing, or N to only show totals for services and expenses for each matter.
|
Format |
1 character |
|
Example |
Type Y |
6. Print billing desc for:
WIP
Retainer billing
Fixed fee billing
Contingent billing
Billing adjustments
This field displays as "(Not applicable)" for brief format.)
You may choose to print billing description individually for each type of item listed above. Answer Y to print the billing descriptions on the edit list, or N otherwise.
|
Format |
1 character for each field |
|
Example |
Press ENTER to default to Y at all fields |
7. Include client if already invoiced ?
Answer Y to print a client on the edit list if an invoice for the client has already been printed but not yet posted. If you answer N, then only clients for whom invoices have not yet been printed will be included on the edit list.
|
Example |
Press ENTER for the default of N |
8. Invoice date
The date to be entered here is the one you plan to use when you print invoices for the clients whose billing information appears on this edit list.
You may press ENTER to use the system date, or if you have previously printed this edit list or invoices (but not yet posted them), then you may press ENTER to use the invoice date entered earlier.
|
Format |
MMDDYY |
|
Example |
Type 33113 |
|
Note |
All WIP items which are to be billed on an invoice must be dated on or before the date used on the invoice. The date entered here must be on or after the date of any WIP item selected for billing for any client. |